I am not too sure how to write this post because it was a lot of work, and I will probably be all over the place with the renovation. The basement was straight out of the 1970's. Red-orange carpet, wood paneling, silver-foil wallpaper and beads, omg the horror! Ok, so it wasn't that bad, wait, what am I saying, it was that bad! See for yourself!

The saving grace for this basement was the bar. I had/have visions of parties and lots of good times for this basement. I also have dreams of my husband playing all of his video games down there and making it his man-cave.
First of all, we ripped up that awful carpet going down the stairs and into the 'living' area. It was even on the door to the utility area! And the black paint, oh god, black paint! Do you know how hard it is to get rid of black paint? Hard! 2 coats of primer and 1-2 coats in certain areas of white paint. On small trim. I used A LOT of painters tape! After we ripped up the carpets, we started taking down the even more awful drop ceiling, followed by the floor tiles around the bar area.
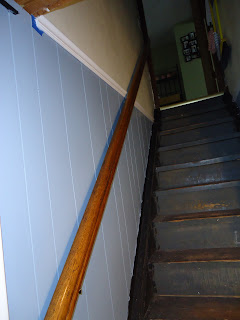
After inspecting the wallpaper in the stairwell, it appeared that it would come off relatively easily as far as wallpaper goes. Boy did it ever! I was peeling off huge chunks! I used a putty knife to help peel so I didn't leave ripped/frayed edges. Once all the paper was off, I used some leftover paint I had from the bathroom reno to paint the walls the wallpaper had been on. It truly did brighten it right up making it look so much better. I also had been trying to decided what color to paint the basement. I was not going to mess with putting up drywall because taking down the paneling to do it would have been a huge project. I decided on a nice blue color and my vision was blue with white trim. So, I got Behr Paint and Primer in one and painted the paneling in the stairwell. I also had some chair rail left over from the living room project so I put that up between the wall and paneling transition. I was really proud of myself and couldn't wait to do the rest of the basement.
I then decided since the wallpaper came off so easily from the stairwell walls, I would try to take it off the wall behind the bar. It came off pretty good, but what I found underneath was no bueno. The hot-water line is not hooked up to the sink at the bar so if you turn on that handle, water runs out onto the floor, under the tiles and over to the wall. Yep, the drywall was moldy about 6" up. At this point, we knew the drywall had to go. We also had decided we wanted to eventually put in a cedar closet on the other side of the wall. This wall was not studded properly, it was using 2x2's instead of 2x4's. So we ripped the.whole.thing.down. This way, we get a new wall, done correctly, and can also frame in a door for future closet and easier access to storage area.
 |
| Standing behind bar looking at new wall (and all of our stuff) |
 |
| Backside of the new wall, standing where utility area is |
Next up was the ceiling and lighting. The ceiling was nasty drop ceiling tiles with black grid. There was also a shop light that you had to plug in to use each time and a recessed light over the bar. We ripped down the whole ceiling and all lighting fixtures and started over. My husband wasn't too sure about putting up a drop ceiling by ourselves but I managed to convince him it was our only option considering we would still need access to everything up there.
 |
| We were so proud of ourselves getting the first 2 tiles in |
 |
| Even prouder when we got the first 2 lights in and wired/working |
.JPG) |
| 2 of the 4 new lights on the bar side, and 2 rows of tiles |
.JPG) | |
| Got most of the grid up and lights wired and working on switches |
I think this is it for this post, it shows all the demo and some stuff put back together. The next post will have the before and after pictures. This post does no justice to the transformation. Hold tight, before and afters coming!
.jpg)
.jpg)
.jpg)

.jpg)


.JPG)


.JPG)

No comments:
Post a Comment